How to Create And Deploy A Blazing Fast Website with GatsbyJS, GitHub and Netlify
Complete guide to build and deploy a blazing fast and modern website for free (with custom domain).
I created a personal website for blogging and showcase some of my creative projects. It was a rather bumpy learning curve as I had a lot of questions and considerations along the way. Unfortunately, most of the tutorials I found are fragmented bits here and there, so I thought I would want to write a detailed tutorial on this. If you are someone who is not a web developer but has some coding knowledge and wants to build a modern personal website for free (no Wordpress or website builders), this post is for you!
The goal of this post is to show you step by step how to create, deploy and configure a simple blog/ portfolio website with your own custom domain name. Let’s get started!
My plan of attack (i.e. tooling setup)
At the beginning I was going back and forth among a few options for my little blog/ portfolio website:
- coding my website from scratch
- using Static Site Generators
- using Wordpress/ other CMS.
Below is an overview I created after scouring so many posts and websites. I’m comparing them in the following aspects: (1) flexibility & freedom, (2) performance, (3) knowledge and skills required, (4) security, (5) scalability and maintenance. This will hopefully help you answer the million dollar question of what to choose:
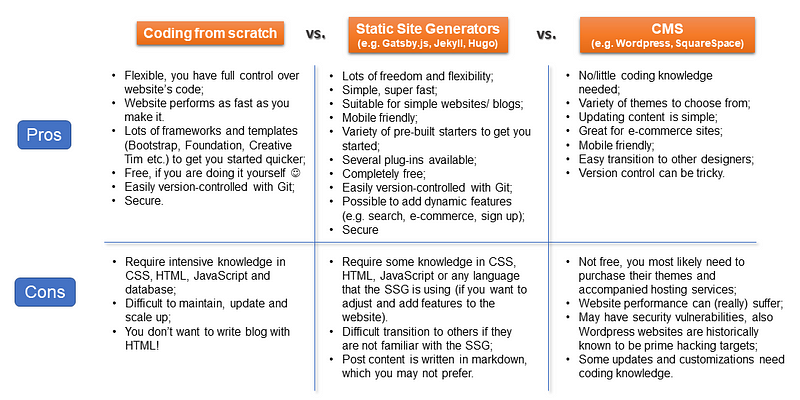
After analysing the pros and cons of these options, I decided to go for Static Site Generators (SSG). This is because I can code and want to have more control of the underlying stuff of my website. Also, I just want a simple and neat blogging website, so installing tons of Wordpress plugins sounds not very appealing to me.
Specifically, I used GatsbyJS because I’m more familiar and comfortable with JavaScript and React in general, which is the language Gatsby is built on. In addition, it’s an already mature SSG and has great features and plug-in ecosystem. If you are interested in knowing more about other SSGs, here is a nice comparison of the top ones at the moment.
What is a Static Site Generator?
A Static Site Generator is an application that takes content (commonly written in Markdown), applies it to templates, and generates a set of purely static HTML files, ready to be delivered to visitors.
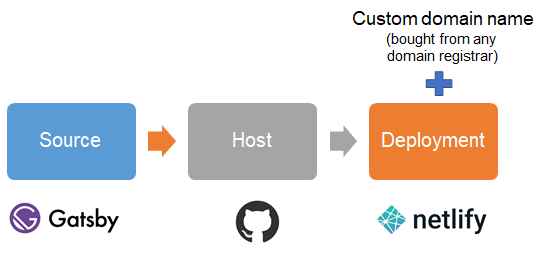
Next, we also need to figure out the other pieces of the puzzle for the website, namely domain name, hosting and deployment. Here’s the setup I have:
If you want to make database manipulation more user-friendly (for example, when your website falls in the hands of non-technical users who’ll have a hard time navigating through code repos), you can consider pairing your SSG with a headless CMS such as Contentful. But this is optional, you can certainly still do well without it.
Set Up Your Development Environment
Before building your first Gatsby site, you need to get some installation in place.
#1. Node.js
Since Gatsby is built with Node.js, we need to have it installed in order to use Gatsby. If you are using a Windows operating system, you can simply download and install it to your machine.
#2. Git
We will need Git to download Gatsby “starter”(partially built sites with some default configuration) and version control + host our project later. If you haven’t already had it, you can install it here for Windows.
#3. Gatsby CLI
The Gatsby CLI tool lets you quickly create new Gatsby-powered sites and run commands for developing Gatsby sites. You can use npm to install it globally. Open your terminal and run the following:
npm install -g gatsby-cli
You can also view the available commands that you can use with Gatsby CLI:
gatsby --help
Start building your website
Gatsby provides a lot of (free) prebuilt starters that you can choose from to fit your website’s purposes, including blogging sites, online shop or simple portfolio website. Suppose you want to use this Fiction blog theme, which is open source, you can simply go to the terminal, change directory to the folder you want to store your site and download the code from Git (note that you can name your website folder anything rather than mynewwebsite):
gatsby new mynewwebsite https://github.com/dvzrd/gatsby-sfiction
After the download is complete, you can serve the site with local host using:
gatsby develop
Now, if you go to your web browser at http://localhost:8000/, you should see the website there.
Next, you may want to change the default values in the gatsby-config.js file to suit your personal profile information. You should see a folder with all the posts in markdown file (.md), where you can start creating your own posts! If you are more familiar with React, HTML and CSS, you can also dive into the React components and adjust their appearance, as well as add new dynamic features.
The Gatsby doc and tutorials provide a very good foundation for you to understand and start manipulating a gatsby starter.
In addition, writing posts in markdown is fairly easy. Here’s the markdown syntax documentation for your reference.
Uploading to Github
Once you’re happy with the configuration and basic features of your new website, we come to the fun part — hosting and deploying your site.
Create a repository on your Github and upload your website folder. Since your Gatsby website folder contains a few subfolders, using Github website and trying to drag-drop your folders into the Git repo might not work. The easiest way, therefore, is to use Git Bash. First you cd into your website folder, then type the following:
git commit -am "Uploading files"
git remote add origin https://github.com/yourUsername/yourRepository.git
git push -u origin master
git push origin master
Now all your files should be uploaded to your Git repo. We are now ready to deploy our site!
Deploy to Netlify
In this section, I will explain how to deploy your personal website for free using Netlify.
Netlify vs. Github pages
Note that another free option is to use Github pages, in fact, many people use it for their personal website. It’s a great option as well — simple and straight-forward to get your website up and running. However, in the long run, you may be better off with Netlify because of the additional features it offers. In addition, if you need to scale up your site in the future, there are paid plans for you to choose from.
Here’s a comparison made by Netlify (it can be a little biased but just to give you an idea):
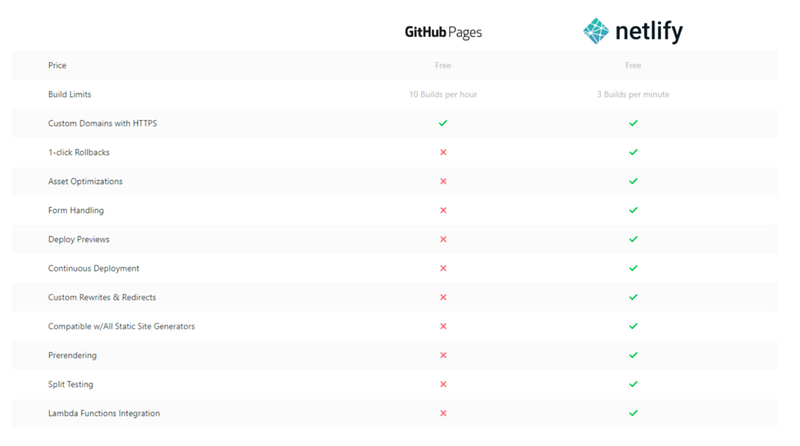
In reality, I’ve seen a few professional developers and coding savvy people using Netlify for their blogs ( here and here). For me, it’s another proof that it’s a good choice for static pages.
What is Netlify
It is a cloud computing company that offers hosting and serverless backend services for web applications and static websites. They offer several plans for hosting websites, depending on the size of the project. For a personal website, it’s fine to use the free option.
Deploy your site from Github
First, you need to sign up on Netlify website with your Github account. This will connect your Netlify account with your Github.
You can follow this step-by-step tutorial to deploy your site from Github. Once you are done, you should have an overview like this:
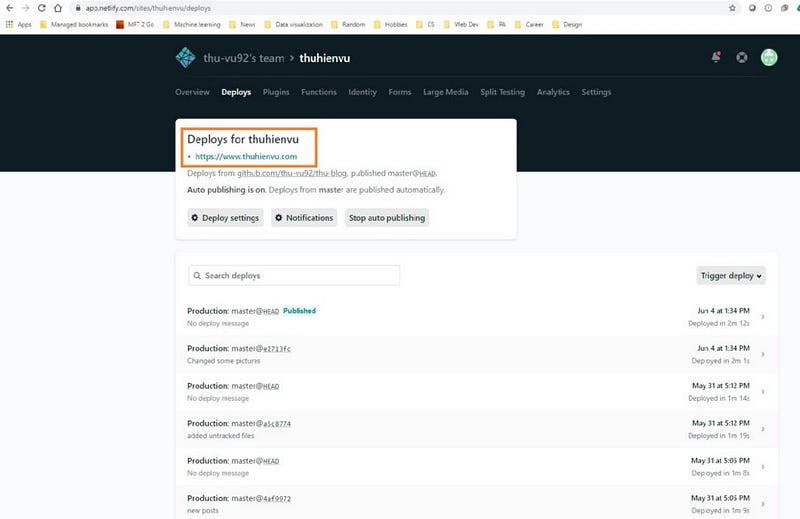
Note that here I already have a custom domain name (.com). In your case, most likely your site will still have a random-name.netlify.app domain at this stage. You may be okay with this domain name for now, but if you already own a domain, you can certainly configure it to connect to your website.
Using custom domain
To customize your domain name, go to Settings > Domain management > Add domain alias.
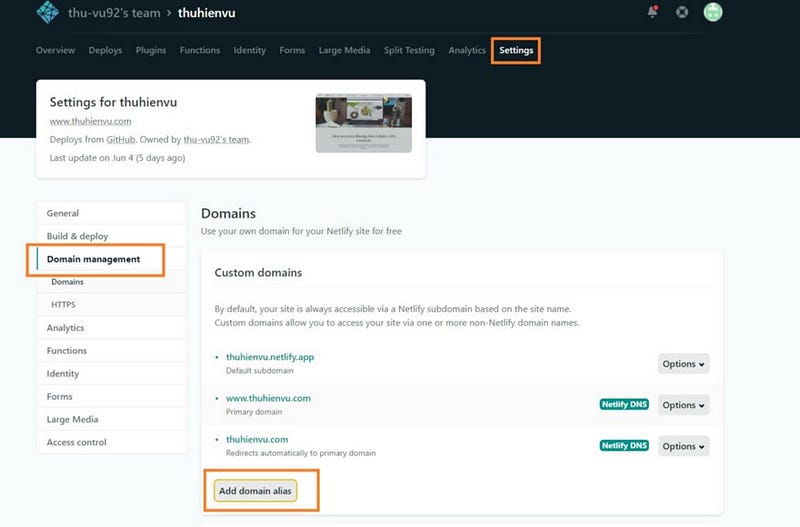
Once you’ve added your custom domain name, the next thing to do is to go to your domain registrar and configure your domain name. The specific instructions vary across different main registrars, but broadly you will need to configure the following:
- A-Host: 104.198.14.52 (this is Netlify server IP address)
- CNAME: [your-website-name].netlify.app (for example, in my case it is thuhienvu.netlify.app)
- Name server:
dns1.p01.nsone.net
dns2.p01.nsone.net
dns3.p01.nsone.net
dns4.p01.nsone.net
Make sure you save everything. By now, you should be able to see your website live with your custom domain! Congratulations! :)
But wait, you may see something strange on your browser:

This is because your site is still using HTTP protocol, which is incapable of providing a secure connection. Nowadays, all websites on the Internet have to use HTTPS protocol and data are encrypted when transferred over the Internet (the “S” stands for “Secure”). Traditionally, you will have to buy an SSL certificate for your website. However, Netlify (and also Github Pages) nowadays offers free SSL/TLS certificate.
Scroll down to the HTTPS section ( Settings > Domain management > HTTPS). You can now provision a SSL/TLS certificate for your website with one click. Really simple, isn’t it?
If you see some kind of error appears, it is most likely because it takes some time for the certificate to actually work. You can get yourself a coffee in the meantime, and your website should work properly in no time.
Update your website
When making changes to your website locally, you can view how the website looks locally (at http://localhost:8000/) by running:
gatsby develop
To push your changes to your website, first, you need to commit and push the changes to your Git repo. Afterwards, on Netlify website, go to Deploys tab and click on Trigger deploy > Deploy site button as follows:
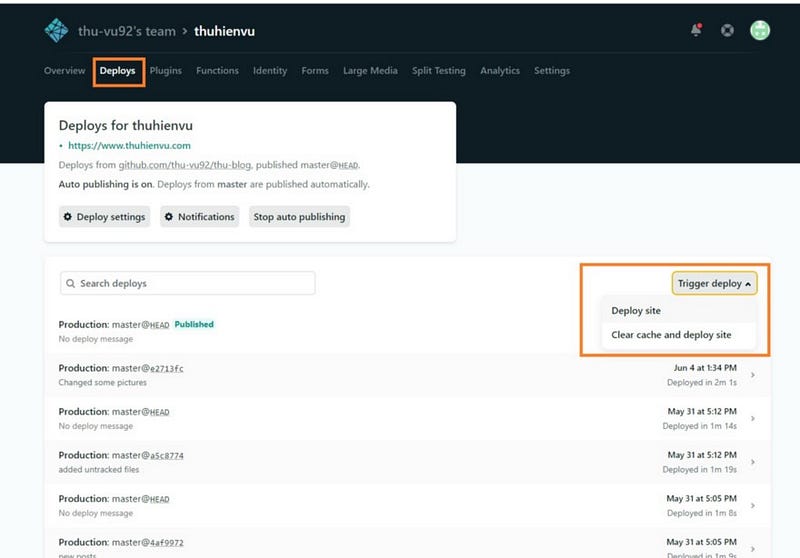
After a few minutes, your website should be updated with new changes. You can also see the deployment log unfold as the site is being deployed. Here’s a full tutorial if you would like to look up additional details.
Congratulations & Final thoughts
I would like to first congratulate you on getting your website live!
In this post, you’ve learned how to:
- Create a Gatsby website using a starter
- Host and version control your site with Github
- Deploy your site from Github using Netlify
You now have your website up and running, version controlled with Git, having your own domain name. All hosted for free! And the great thing is, you are in total control of your website including the code, the appearance and all additional features behind it.
I hope this post is useful. I would love to hear your thoughts in the comment section and how you built your personal website.
Originally published at https://www.thuhienvu.com.

